Hi there everyone! It’s been really a while since I last write a tutorial here, the last time it was a series of RPG tutorials. Now I feel like I want to write another series of tutorials, this time I called it able game development. What is this? It’s about designing and making a game that those with disabilities can enjoy as well. I’ve actually wrote about it on my own blog, but I thought that I’d share it here as well.
I want to state this clearly first, that these designs are purely optional. You’re free to include this in your game or not, but by including it will make those with disabilities to enjoy the same kind of entertainment that you do too. The resources and ideas for these series are taken from other site. They have a really good documentation about many kinds of disabilities and what we can do as developers to implement them in our game. Here, I’ll try to implement them using my weapon of choice, Construct 2.
First we’re going to make game design that caters to people with mobility disability. This kind of disability hinders their movement, preventing them from doing tasks that for us are simple enough, like playing with two hands. People with this kind of disability are the largest in numbers among the disabled people, if your game can help them play a lot of people will thank you.
The first design element that we’ll discuss is alternative configuration. This is simply various other control configurations beside the default one that the developer has created so players can just pick one that is most comfortable to them according to their disabilities. There are at least three different configurations here: default control, right handed control, and left handed control.
If you’re playing your game try to play it with one hand only, either left or right hand. Can you still play it? What buttons can you reach with only one hand? This is how you simply test your game. Now let’s move on to how we’re going to make it in Construct 2.
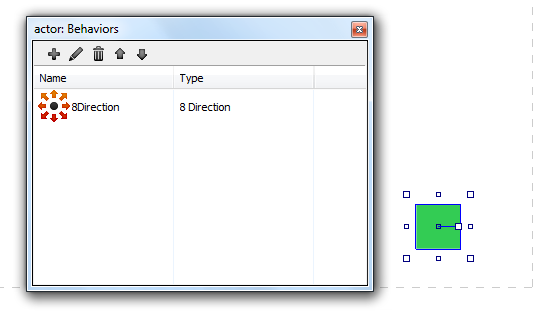
First add two more objects: Keyboard and Sprite. Rename the sprite into “actor” and add an 8 direction behaviour.

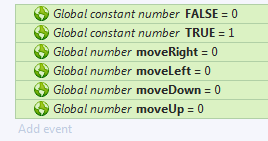
change the default control property to “no” so actor can’t move using default arrow buttons. We’ll allow him movements with arrow key buttons later, we’re doing it this way to demonstrate the alternative configuration functionality. After that add these variables:

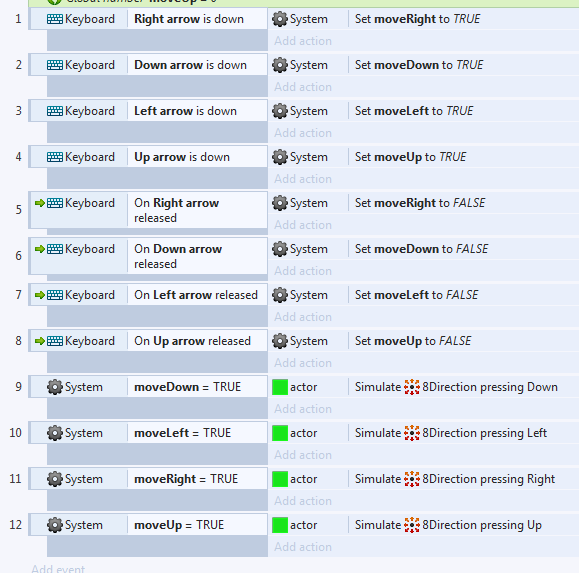
Those are the variables we need to move our actor. Two constant variables TRUE and FALSE are created to make our code easier to read. Then how do we move our actor? Using the code seen below:

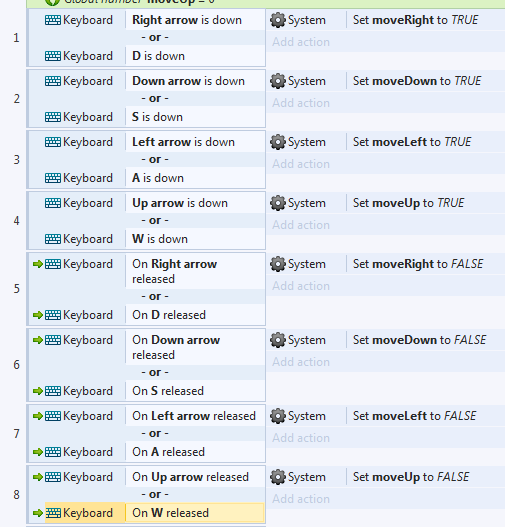
Now we can move as if we’re using the default control, next up we’re gonna add other buttons to accomplish the same task. How? see the piece of code below:

We just added a new movement button configs, using WASD keys. It may look simple but for people who are unable to move their right hand, this additional control config makes it easier for them to play the game. You can develop this code further. If there are jumping or shooting ability in the game, what are other configs for those two actions? Can it still be played with one hand?
I think that’s all for the first part of this tutorial. Later we’re going to tackle other design decisions that makes it easier for people with disabilities to play our game.


