- Construct 2 RPG Series by Aryadi Subagio (@AryadiPS):
Ok, so now I wanted to make a tutorial about how to make an RPG in Construct 2, because Construct 2 is a tool that made it easy to create any kind of game.
Why RPG? Simple, because I want to. And I’m sure there are a lot of people who want to make RPG as well.
I don’t know how often will I be writing this tutorial but I’ll try to complete it up to the point when the game is finished. This tutorial assumes that the reader is already familiar with the use of Construct 2, so basic things like making new objects / layers / events, will not be covered.
Did you come across any errors in this tutorial? Please let us know by completing this form and we’ll look into it!

FINAL DAYS: Unlock coding courses in Unity, Godot, Unreal, Python and more.
Thankfully, there’s a tutorial that teaches the basics of game developing in Construct 2. You can give it a look before going on with this tutorial. If you’re done following that guide, let’s continue.
First, I’ll make a simple design of this game.
Title: My RPG Project (temporary title)
Platform: PC, Mac, Linux
Players: Single player
Battle system: Action based battle system with random encounter. Players will roam around dungeons / world maps and then will be suddenly and randomly switched to battle screen. The battle will be similar to Tales of game series, action based 2D sideview battle.
Winning condition: Players defeat the last boss at the end of the game.
Losing condition: Players defeated at either a boss or random battle, unless the ones that are scripted to lose.
Challenge: Battles
Reward: EXPs, items, and money after defeating monsters.
That will be enough for now, we will complete it as we go. For the first tutorial I want to start with a basic battle system. I have uploaded the .capx file on dropbox and it can be downloaded here (NOTE: the file has already been updated because the tutorial on my blog is already progressing, so it has an additional piece of code).
The end result of this tutorial will be like this

Pretty good, huh? The explanation of how to make it is down here:
First, make two sprite objects: character and characterSprite. Character is the in game character that gamers play as, and characterSprite is the sprite of that character. Why is it separated? It makes it easy for us to make gamers able to switch active playable characters, we just need to change the sprite.
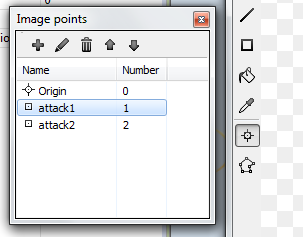
Let’s take a quick look at character object’s image point

This will make it easier for us to add attack effects later, because I won’t be necessary to make new image points when we change the sprite.
Switching to code, when the layout starts, I want to pin characterSprite to character object so that the sprite follows the character. And we’re gonna move the character using 8 simulated directions, depending on the value of variables movingLeft and movingRight. The value of these variables will change on the keyboard input or gamepad input to make sure all input methods produce the same movement. And then, we’re going to decide what will happen when the key “A” or “D” is released. In this case we want the character to face left/right.
For the jumping code, I’m using platform behavior instead of 8 directions, because platform behavior already provides an easy jumping code. But if we use platform behavior we need to have a solid type object for the character to stand on. That’s why I added an invisible solid object named ground.
For the attacking code, we will use a function. This is because the code to attack will be called multiple times for various input methods. To make it easier to code, we’re gonna use a function.
Next, we’re going to write the code for gamepad input. For gamepad input, Construct 2 can use many kinds of gamepads that are compatible with PC but use Xbox 360 gamepad for the most compatible one. Ideally, we should use as much variety of gamepads as possible in testing, to ensure that our game can be played normally.
The code for gamepad input is basically the same as with keyboard input, but we need to remember that players can use analog stick or D-Pad to move the character and we must provide the same input for both methods. One more thing to remember: analog sticks don’t fire events. It’s different than D-Pad that can fire on pressed or released events. We need to remember this when coding, because this will decide how we treat analog sticks.
And then, there’s the code for animation. In general, this part of the code will change the character’s moving animation based on the variable’s movingLeft or movingRight. One thing to be considered is that when the character stops walking, I don’t use movingLeft or movingRight but instead I use string variable moving.
Why? Because when using keyboard input we can depend on the On key released event to decide which button was last pressed and determine facing direction from there. The problem is, when the player moves the character using analog sticks and then stops, we can’t decide the facing direction, because analog sticks don’t fire events. And if the character is facing either left or right, the X axis value on analog sticks is still zero.
X axis has 3 values: 100 when the analog is moved right, -100 when moved left, 0 when it stays in the middle. That’s why I changed the moving string variable based on X axis value. And when the character is not moving I take a look at the moving variable’s value, and determine facing direction from there.
If you try to run a layout, the character can now move, jump and attack.
Next time, I’ll add an enemy.
See you in the next blog post!!


