They say space is the final frontier. We haven’t got very far when it comes to exploring it, but what if you could bypass this sad reallity by playing a retro-style space exploration game called SpaceHipster?
Moreover, what if you could learn how to make this simple game from scratch using the awesome Phaser framework?

Phaser is a fun, free and fast HTML5 2D game framework created by Richard Davey and supported by a great community of developers who usually hang out at the HTML5GameDevs forums.
Table of contents
Learn Phaser by building 15 games
If you want to master Phaser and learn how to publish Phaser games as native games for iOS and Android make sure to check Zenva‘s online course The Complete Mobile Game Development Course – Build 15 Games.
Source code files
You can grab them from here. If you want us to notify you when we release new tutorials on Phaser or HTML5 game development don’t forget to click “subscribe to our list” when downloading the files (if you choose not to you won’t hear from us!).
Tutorial goals
1-Learn the basics of Phaser by creating simple space exploration game (called SpaceHipster) that runs great on desktop and mobile.
2-Learn some basic 2D game mechanics.
Concepts covered
- Game states
- Game basic configuration
- Preloading assets
- Working with sprites and spritesheets
- Audio
- Autoscrolling tiles
- Adding a welcome screen
- Creating game elements
- Basic 2D physics
- Handing input (single click or tap)
- Particles
- Game over
Tutorial requirements
-Basic to intermediate knowledge of JavaScript. If you need a refreshment feel free to check our JavaScript video course at Zenva Academy.
-A code editor or IDE. Current Pablo prefers Sublime Text, but past Pablo has shown more affection for other IDE’s and I’m sure future Pablo will have a say too.
-Download Phaser from it’s Github repo. You can either clone the repo or download the ZIP file.
-You need to run the code and Phaser examples using a local or remote web server. Some popular options are Apache (WAMP if in Windows, MAMP if in Mac). A lightweight alternatives are Mongoose web server and Python’s HTTP server. Take a look at this guide for more details.
-Download the full tutorial source code and game assets here. If you want us to let you know when we release new tutorials on Phaser or HTML5 game development don’t forget to subscribe to our list!
-Have the documentation and the examples page at hand. Also don’t forget that you can always find answers by looking at the source code of Phaser.
New Project
Let’s begin with a new folder, an index file and the Phaser file, which you can grab from the “build” directory of the downloaded Phaser zip or cloned repository.
If you are on development mode (as opposed to production, which would be deploying your game to it’s final destination for the world to play it) I recommend including the non-minified phaser.js file (as opposed to phaser.min.js). The reason being, it’s not a good practice to treat your game engine as a black box. You want to be able to explore the contents of the file and debug properly. Not all the answers will be on Google so a lot of times the best way to do is just read the original source code to understand what’s going on.
Our index.html file will look like this:
<!DOCTYPE html>
<html>
	<head>
		<meta charset="utf-8" />
		<title>Learn Game Development at ZENVA.com</title>

   		<script type="text/javascript" src="js/phaser.min.js"></script>

		<style>
		  body {
		    padding: 0px;
		    margin: 0px;
		  }
		  </style>
	</head>

	<body>
		<!-- include the main game file -->
		<script src="js/main.js"></script>
	</body>
</html>
There is nothing to see/show yet!
States
In Phaser, all the action occurs around States. You can think of them as main moments of your game. Think of a soccer game, you have a State when doors are open and people start coming in. Then you have a State when the pre-game show takes place. Then a State where the pre-game show stuff is removed from the field. Then a State when the game begins, and so forth.
Phaser gives you a lot of flexibility as what States you can have, but there is a de-facto convention which is used in many games and tutorials. The naming might vary a bit but it’s usually something like:
Boot State: general game settings are defined, and the assets of the preloading screen are loaded (example the loading bar). Nothing is shown to the user.
Preload State: the game assets (images, spritesheets, audio, textures, etc) are loaded into the memory (from the disk). The preloading screen is shown to the user, which usually includes a loading bar to show the progress.
MainMenu State: your game’s welcome screen. After the preload state, all the game images are already loaded into the memory, so they can quickly accessed.
Game State: the actual game where the FUN takes place.
Lets now create files for all our states and a file called main.js which is where we’ll add them into the game. main.js will be the following, the other files are empty for now:
var SpaceHipster = SpaceHipster || {};

SpaceHipster.game = new Phaser.Game(window.innerWidth, window.innerHeight, Phaser.AUTO, '');

SpaceHipster.game.state.add('Boot', SpaceHipster.Boot);
//uncomment these as we create them through the tutorial
//SpaceHipster.game.state.add('Preload', SpaceHipster.Preload);
//SpaceHipster.game.state.add('MainMenu', SpaceHipster.MainMenu);
//SpaceHipster.game.state.add('Game', SpaceHipster.Game);

SpaceHipster.game.state.start('Boot');
The first thing we do is create a unique namespace so that we avoid conflicts with other libraries we might be using. In this example the namespace will be SpaceHipser. You can use whatever you want for this, as long as it’s a unique name which will be unlikely found elsewhere. You can also just not use it and work directly with game and the states names, but I’d recommend using it just for best practice.
var SpaceHipster = SpaceHipster || {};
Means that if the object exists already, we’ll use it. Otherwise we’ll use a new object.
SpaceHipster.game = new Phaser.Game(window.innerWidth, window.innerHeight, Phaser.AUTO, '');
We initiate a new game and set the size of the entire windows. Phaser.AUTO means that whether the game will be rendered on a CANVAS element or using WebGL will depend on the browser. If WebGL is available it will be used as the first option (as the performance is better).
We then register the states and finally launch the Boot state.
Include these added files in index.html:
<!DOCTYPE html>
<html>

	<head>
		<meta charset="utf-8" />
		<title>Learn Game Development at ZENVA.com</title>
    <script type="text/javascript" src="js/phaser.min.js"></script>
		<script type="text/javascript" src="js/Boot.js"></script>
		<script type="text/javascript" src="js/Preload.js"></script>
		<script type="text/javascript" src="js/MainMenu.js"></script>
		<script type="text/javascript" src="js/Game.js"></script>

		<style>
		  body {
		    padding: 0px;
		    margin: 0px;
		  }
		  </style>
	</head>

	<body>
		<!-- include the main game file -->
		<script src="js/main.js"></script>
	</body>
</html>
States methods
States have some reserved methods which serve specific purposes. These are the ones we’ll use in this tutorial. You can find the full list here.
–init: is called upon State initialization. If you need to send parameters to the State this is where they’ll be accessible (more on that later)
–preload: this is where the assets are loaded.
–create: this is called upon asset loading completion.
–update: this is called on every game tick. Basically it’s called “many times per second” so this is where you want to include things that need to be constantly tested such as collision detection.
Boot State
Before talking about the Boot state I’d like to say that in theory, you could not use states where all the game takes place, but using states allows you to organize your code better.
The Boot state is a dark place. This is where we define the screen size and other general game configuration options such as the physics engine we’ll use (Phaser has three of them, we’ll use the simplest one). Also, in the Boot state we load the assets that will be shown in the Preload state.
So.. the Boot state loads the assets for the Preload state, and the Preload state loads the game assets. It’s sounding like “a dream within a dream” isn’t it? you might think, why instead not load the game assets there? Well nothing stops you from doing that, but the thing is, the game assets will most likely take much longer to load than the preload screen assets. By loading the preloading screen assets (which should be lightweight) we minimize the time where there is a blank screen (something users don’t love). Then, on the Preload state we’ll have time to load everything else with a nice and charming preload screen.
Content of Boot.js:
var SpaceHipster = SpaceHipster || {};

SpaceHipster.Boot = function(){};

//setting game configuration and loading the assets for the loading screen
SpaceHipster.Boot.prototype = {
  preload: function() {
  	//assets we'll use in the loading screen
    this.load.image('logo', 'assets/images/logo.png');
    this.load.image('preloadbar', 'assets/images/preloader-bar.png');
  },
  create: function() {
  	//loading screen will have a white background
    this.game.stage.backgroundColor = '#fff';

    //scaling options
	this.scale.scaleMode = Phaser.ScaleManager.SHOW_ALL;
	this.scale.minWidth = 240;
	this.scale.minHeight = 170;
	this.scale.maxWidth = 2880;
	this.scale.maxHeight = 1920;

	//have the game centered horizontally
	this.scale.pageAlignHorizontally = true;

	//screen size will be set automatically
	this.scale.setScreenSize(true);

	//physics system for movement
	this.game.physics.startSystem(Phaser.Physics.ARCADE);

    this.state.start('Preload');
  }
};
Preload State
Our preload screen will just a logo and the loading bar. Preload.js:
var SpaceHipster = SpaceHipster || {};

//loading the game assets
SpaceHipster.Preload = function(){};

SpaceHipster.Preload.prototype = {
  preload: function() {
  	//show logo in loading screen
  	this.splash = this.add.sprite(this.game.world.centerX, this.game.world.centerY, 'logo');
    this.splash.anchor.setTo(0.5);

    this.preloadBar = this.add.sprite(this.game.world.centerX, this.game.world.centerY + 128, 'preloadbar');
    this.preloadBar.anchor.setTo(0.5);

    this.load.setPreloadSprite(this.preloadBar);

  	//load game assets
  	this.load.image('space', 'assets/images/space.png');
  	this.load.image('rock', 'assets/images/rock.png');
    this.load.spritesheet('playership', 'assets/images/player.png', 12, 12);
    this.load.spritesheet('power', 'assets/images/power.png', 12, 12);
  	this.load.image('playerParticle', 'assets/images/player-particle.png');
    this.load.audio('collect', 'assets/audio/collect.ogg');
    this.load.audio('explosion', 'assets/audio/explosion.ogg');
  },
  create: function() {
  	this.state.start('MainMenu');
  }
};
this.preloadBar = this.add.sprite(this.game.world.centerX, this.game.world.centerY + 128, 'preloadbar');
Is how we load sprites into the screen. We define their coordinates and the name of the asset, if you go back to Boot.js you’ll see that “preloadbar” is how we called the load bar.
this.load.setPreloadSprite(this.preloadBar);
The method setPreloadSprite in Loader entities allows us to grab a sprite (in this case this.preloadBar) and make it into a loading bar. More info in the documentation.

MainMenu State
In this screen we’ll start by showing a scrolled stars background and some text.
SpaceHipster.MainMenu = function(){};

SpaceHipster.MainMenu.prototype = {
  create: function() {
  	//show the space tile, repeated
    this.background = this.game.add.tileSprite(0, 0, this.game.width, this.game.height, 'space');

    //give it speed in x
    this.background.autoScroll(-20, 0);

    //start game text
    var text = "Tap to begin";
    var style = { font: "30px Arial", fill: "#fff", align: "center" };
    var t = this.game.add.text(this.game.width/2, this.game.height/2, text, style);
    t.anchor.set(0.5);

    //highest score
    text = "Highest score: "+this.highestScore;
    style = { font: "15px Arial", fill: "#fff", align: "center" };

    var h = this.game.add.text(this.game.width/2, this.game.height/2 + 50, text, style);
    h.anchor.set(0.5);
  },
  update: function() {
    if(this.game.input.activePointer.justPressed()) {
      this.game.state.start('Game');
    }
  }
};
this.background = this.game.add.tileSprite(0, 0, this.game.width, this.game.height, 'space');
//give it speed in x
this.background.autoScroll(-20, 0);
TileSprites is when you repeat a tile many times to cover a certain area. By using autoscroll and setting a speed in x and y we can make that infinite scrolling effect.
We want to listen for user tap/click to launch the game state and start playing and we do that in the update() method, as it’s something that needs to be constantly checked upon.
Later on we’ll show the highest score in this screen, for now it’ll be undefined.

Game State – Player
Finally we move onto the actual game :) open Game.js:
var SpaceHipster = SpaceHipster || {};

//title screen
SpaceHipster.Game = function(){};

SpaceHipster.Game.prototype = {
  create: function() {
  },
  update: function() {
  },
};
On create we’ll start by setting the dimensions of the game world:
//set world dimensions
this.game.world.setBounds(0, 0, 1920, 1920);
The background will be the stars sprite again, repeated over and over, for which we can create a TileSprite:
this.background = this.game.add.tileSprite(0, 0, this.game.world.width, this.game.world.height, 'space');
The player will be a sprite, initially located in the center of the world:
//create player
this.player = this.game.add.sprite(this.game.world.centerX, this.game.world.centerY, 'playership');
Make it a bit bigger:
this.player.scale.setTo(2);
The player will be animated the entire time:
this.player.animations.add('fly', [0, 1, 2, 3], 5, true);
this.player.animations.play('fly');
If you look at the player.png file you’ll see it has 4 frames, and we defined the dimensions in Preload.js. 5 in here means the frequency of the change. For info in the documentation for Animation.
//player initial score of zero
this.playerScore = 0;
Initial score.
//enable player physics
this.game.physics.arcade.enable(this.player);
this.playerSpeed = 120;
this.player.body.collideWorldBounds = true;
If we want the player to move, to collide with rocks and to collect alien energy powerups we need to include it in the physics system (that we defined in the Boot state).
In the update method, we’ll listen for taps/clicks and we’ll set the speed to that location:
update: function() {
    if(this.game.input.activePointer.justPressed()) {

      //move on the direction of the input
      this.game.physics.arcade.moveToPointer(this.player, this.playerSpeed);
    }
  },
See how the player leaves the screen after a while. We need the camera to follow the player, so add the following in the create method, after the animation code:
//the camera will follow the player in the world
this.game.camera.follow(this.player);
Load sounds
We preloaded two audio files already (they are both ogg files, for full browser support load mp3 versions as well). Let’s create the audio objects so we can play them later (using their play() method)
//sounds
this.explosionSound = this.game.add.audio('explosion');
this.collectSound = this.game.add.audio('collect');
Game State – Asteroids
Floating around space is fun (not that I’ve done it) but I’m sure it gets boring after a while. Let’s add some huge floating rocks that will crash the ship upon collision.
Bellow the camera code in create(), add the following:
this.generateAsteriods();
And lets create that method (see how we are not creating our own methods int he State, it’s fine as long as it doesn’t use the reserved method names):
generateAsteriods: function() {
    this.asteroids = this.game.add.group();

    //enable physics in them
    this.asteroids.enableBody = true;
    this.asteroids.physicsBodyType = Phaser.Physics.ARCADE;

    //phaser's random number generator
    var numAsteroids = this.game.rnd.integerInRange(150, 200)
    var asteriod;

    for (var i = 0; i < numAsteroids; i++) {
      //add sprite
      asteriod = this.asteroids.create(this.game.world.randomX, this.game.world.randomY, 'rock');
      asteriod.scale.setTo(this.game.rnd.integerInRange(10, 40)/10);

      //physics properties
      asteriod.body.velocity.x = this.game.rnd.integerInRange(-20, 20);
      asteriod.body.velocity.y = this.game.rnd.integerInRange(-20, 20);
      asteriod.body.immovable = true;
      asteriod.body.collideWorldBounds = true;
    }
  },
this.asteroids = this.game.add.group();
Phaser allows us to create groups of elements. This makes sense when you want to restrict say collision detection to a certain group. It also allows you to set some group-level properties.
var numAsteroids = this.game.rnd.integerInRange(150, 200);
How many asteroids will we have? lets make it random within a range using Phaser’s method for random integer intervals:
Then we created the actual rocks. Set their size to be random-ish, and enable their physics properties:
By using immovable = true we made it so that their trajectories doesn’t get affected when crashing with the player (we haven’t set collision yet thou. After we do, try setting this property to false and see the difference).
We don’t want them to leave the game world:
asteriod.body.collideWorldBounds = true;
In update(), let’s add collision detection between the player and the asteroids group:
//collision between player and asteroids
this.game.physics.arcade.collide(this.player, this.asteroids, this.hitAsteroid, null, this);
Define the hitAsteroid() method where we play an explosion sound, destroy the ship and go to game over:
hitAsteroid: function(player, asteroid) {
    //play explosion sound
    this.explosionSound.play();

    //player explosion will be added here

    this.player.kill();

    this.game.time.events.add(800, this.gameOver, this);
  },
Particles and Game Over
When you hit a rock we can make the ship explode using particles. Particles are a game development technique that allows you to work with many individual elements or “particles”. This can be used to simulate explosions, emissions and much more. Check out the examples for ideas.
Lets make the ship explode when hit by a rock. Remember we loaded an image asset called playerParticle, which was just a blue square. We’ll use that for the ship explosion.
hitAsteroid: function(player, asteroid) {
    //play explosion sound
    this.explosionSound.play();

    //make the player explode
    var emitter = this.game.add.emitter(this.player.x, this.player.y, 100);
    emitter.makeParticles('playerParticle');
    emitter.minParticleSpeed.setTo(-200, -200);
    emitter.maxParticleSpeed.setTo(200, 200);
    emitter.gravity = 0;
    emitter.start(true, 1000, null, 100);
    this.player.kill();

    //call the gameOver method in 800 milliseconds, we haven't created this method yet
    this.game.time.events.add(800, this.gameOver, this);
  },
When starting the emitter, the first “true” parameter is because this will be a single particle emission (a single explosion), which will last 1 second (1000 milliseconds), then we put null because that’s also for repeating emissions (it defines how many per emission), lastly we’ll send 100 particles on this single explosion.
Kill the player sprite as well and call a gameOver method after 0.8 seconds (800 milliseconds), which we need to create:
Game State – Collectables
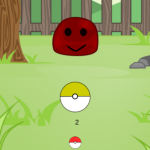
So far there is not much to do in the game. Let’s create collectables and add score. Collectables will be some weird alien jewel that your ship wants to find in this hostile place.
We’ll follow a similar approach than we did with the rocks. In create() add this before generateAsteroids (we want the collectables to go under the asteriods, if we add them afterwards they’ll show on top of them):
this.generateCollectables();
Add the new method to create and animate these alien jewels/powerups:
generateCollectables: function() {
    this.collectables = this.game.add.group();

    //enable physics in them
    this.collectables.enableBody = true;
    this.collectables.physicsBodyType = Phaser.Physics.ARCADE;

    //phaser's random number generator
    var numCollectables = this.game.rnd.integerInRange(100, 150)
    var collectable;

    for (var i = 0; i < numCollectables; i++) {
      //add sprite
      collectable = this.collectables.create(this.game.world.randomX, this.game.world.randomY, 'power');
      collectable.animations.add('fly', [0, 1, 2, 3], 5, true);
      collectable.animations.play('fly');
    }
  },
On update() let’s define not collision (which makes the ship stop/”hit” physically the object) but overlap, which won’t affect the ship’s speed:
//overlapping between player and collectables
this.game.physics.arcade.overlap(this.player, this.collectables, this.collect, null, this);
Adding the method to collect and update score:
collect: function(player, collectable) {
    //play collect sound
    this.collectSound.play();

    //update score
    this.playerScore++;
    //will add later: this.scoreLabel.text = this.playerScore;

    //remove sprite
    collectable.kill();
  },
Now you should be able to wonder around and collect alien mana. The only thing we are missing is the score on the screen.
Score and High Score
We’ll show the score using a similar approach to what we did in the MainMenu state. Add this to the end of create():
//show score
this.showLabels();
Let’s add that new method where we’ll take care of displaying the score (and perhaps other stats if you want to expand the game):
showLabels: function() {
    //score text
    var text = "0";
    var style = { font: "20px Arial", fill: "#fff", align: "center" };
    this.scoreLabel = this.game.add.text(this.game.width-50, this.game.height - 50, text, style);
    this.scoreLabel.fixedToCamera = true;
}
this.scoreLabel.fixedToCamera = true;
This is so that the number stays on the same position of the screen regardless the camera movements.
When collecting (on colect() ), update the text content of the label:
this.scoreLabel.text = this.playerScore;
Now, we also want to show the high score in the Menu screen, but hey that’s a different State, how can we pass parameters to another state?
The solution is easy: adding an init() method to the state, where you can add all the parameters you want. Let’s add such a method in MainMenu. We’ll receive the score of the game that was just played (it will use zero if none is passed). Then it will check if it’s the highest and will show it:
 init: function(score) {
    var score = score || 0;
    this.highestScore = this.highestScore || 0;

    this.highestScore = Math.max(score, this.highestScore);
   },
**Note: using the localStorage API you could save this high score, if you want to learn how to use localStorage you can check this tutorial created by Ashley Menhennet, a course creator and trainer at Zenva.
Add a gameOver method in the Game state and modify how we send the player back to the MainMenu state:
gameOver: function() {
    //pass it the score as a parameter
    this.game.state.start('MainMenu', true, false, this.playerScore);
},
The first “true” is because we want to refresh the game world, the second is set to “false” as we don’t want to erase the game’s cache (or we would have to reload all the assets, try with true to see what happens!) then we pass the parameter.
Game finished!

You can now play an entire (very simple) game! Feel free to use this as a basis for your own games as long as you give us credit (link back to us).
If you haven’t already, you can download this tutorial game files and assets here.
Where to go next?
Make sure to check out The Complete Mobile Game Development Course – Build 15 Games and our list of Phaser tutorials.