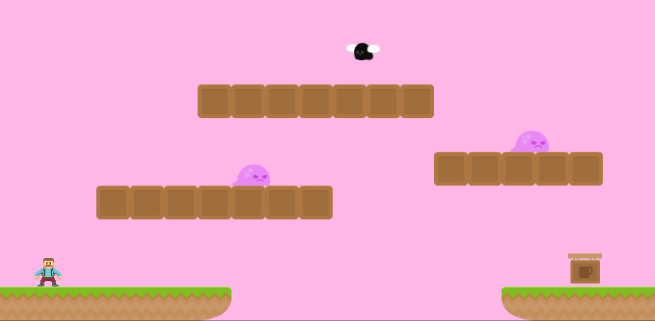
Tiled is a free map editor that can be easily integrated with Phaser. In this tutorial, we will build a simple platformer game using Phaser and Tiled. While the map will be created using Tiled, we will use Phaser to read this map and load all the objects into the level. In this tutorial I’ll assume you’re familiar with the following concepts.
- Javascript and object-oriented programming.
- Basic Phaser concepts, such as: states, sprites, groups and arcade physics.
The following concepts will be covered in this tutorial:
- Using Tiled to create a platformer level.
- Writing a Phaser State that reads the Tiled map and instantiate all the game objects.
- Writing the game logic of a simple platformer.
Table of contents
Tutorial source code
You can download the tutorial source code here.
Did you come across any errors in this tutorial? Please let us know by completing this form and we’ll look into it!

FINAL DAYS: Unlock coding courses in Unity, Godot, Unreal, Python and more.
Creating the map
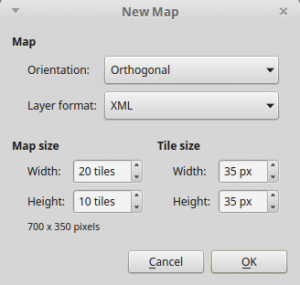
First, we have to create a new Tiled map. In this tutorial we will use an orthogonal view map with 20×10 tiles. Each tile being 35×35 pixels. For those not familiar with it, an orthogonal view means that the player views the game by a 90 degree angle (you can read more about the difference between orthogonal and isometric view here: http://gamedev.stackexchange.com/questions/22277/difference-between-orthogonal-map-and-isometric-map).
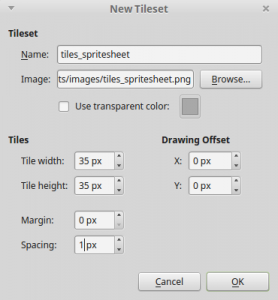
After creating the map, we have to add our tileset, which can be done clicking on “map -> new tileset”. The tileset we’re going to use has 35×35 pixels, and a 1 pixel spacing.
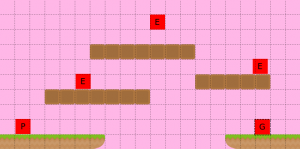
In tiled, there are two types of layers: tile layers or object layers. Tile layers are composed by the sprites of the loaded tileset and are aligned in the map grid. In this tutorial, we will have two tile layers: background and collision. Object layers are not aligned to a grid, and represent the objects of the game. In this tutorial, we will have only one object layer, containing all our game objects.
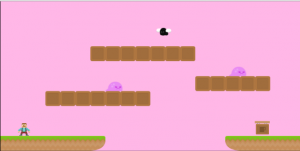
To create tile layers, just use the stamp brush tool to paint the layer with the desired tiles. For the object layer, select a tile image to use and put it in the desired position. Notice that the images used in the object layer don’t represent the actual image that will be used by Phaser during the game. We will have to load the correct asset later in our code. Here is an example of a created map. Feel free to create your own!
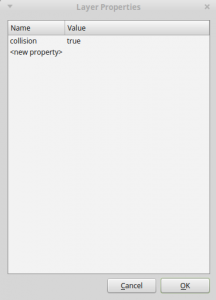
Now, we’re going to set some properties that will allow our game to load the map. First, in the collision layer we will add a property telling our game that this layer may collide with other objects, as shown below:
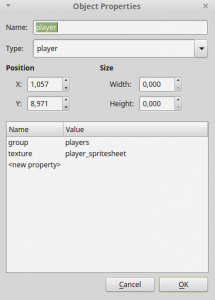
Finally, for each object, we set its properties. The name, type, group, and texture properties are required for our game, since we will use them to properly instantiate the game objects. Any other properties should be defined according to our game logic. For now, we will set only the required properties, after we code the game logic, we can go back to add each object properties.
With the map finished, export it to a json file, so our game can load it.
Json level file
There is some information our game needs to know before loading the map, like the game assets, groups and map information. We will keep all this information in a json file which will be read at the beginning of the game. Below is the json level file we will use in this game. Notice we have to define the assets we will need, the groups of sprites and the map information.
File levels.json in assets/levels
{
    "assets": {
        "map_tiles": { "type": "image", "source": "assets/images/tiles_spritesheet.png" },
        "player_spritesheet": { "type": "spritesheet", "source": "assets/images/player_spritesheet.png", "frame_width": 28, "frame_height": 30, "frames": 5, "margin": 1, "spacing": 1 },
        "slime_image": { "type": "image", "source": "assets/images/slime.png" },
        "fly_spritesheet": { "type": "spritesheet", "source": "assets/images/fly_spritesheet.png", "frame_width": 37, "frame_height": 20, "frames": 2 },
        "goal_image": { "type": "image", "source": "assets/images/goal.png" },
        "level_tilemap": { "type": "tilemap", "source": "assets/maps/level1_map.json" }
    },
    "groups": [
        "enemies",
        "goals",
        "players"
    ],
    "map": {
        "key": "level_tilemap",
        "tileset": "map_tiles"
    }
}
Game states
We will use the following states to run our game:
- Boot State: loads a json file with the level information and starts the Loading State.
- Loading Sate: loads all the game assets, and starts the Level State.
- Tiled State: creates the map and all game objects.
The code for Boot State is shown below. The Boot State loads the json file described above, so the assets can be loaded in the Loading State.
File BootState.js in js/states:
var Platformer = Platformer || {};

Platformer.BootState = function () {
    "use strict";
    Phaser.State.call(this);
};

Platformer.prototype = Object.create(Phaser.State.prototype);
Platformer.prototype.constructor = Platformer.BootState;

Platformer.BootState.prototype.init = function (level_file) {
    "use strict";
    this.level_file = level_file;
};

Platformer.BootState.prototype.preload = function () {
    "use strict";
    this.load.text("level1", this.level_file);
};

Platformer.BootState.prototype.create = function () {
    "use strict";
    var level_text, level_data;
    level_text = this.game.cache.getText("level1");
    level_data = JSON.parse(level_text);
    this.game.state.start("LoadingState", true, false, level_data);
};
As shown below, the Loading State loads all the game assets in the preload method, and when it is finished, it starts the Tiled State in the create method. Notice that, since we specify the asset type in the json file, it is straightforward to load them, and we can load different kinds of assets.
File LoadingState.js in js/states:
var Platformer = Platformer || {};

Platformer.LoadingState = function () {
    "use strict";
    Phaser.State.call(this);
};

Platformer.prototype = Object.create(Phaser.State.prototype);
Platformer.prototype.constructor = Platformer.LoadingState;

Platformer.LoadingState.prototype.init = function (level_data) {
    "use strict";
    this.level_data = level_data;
};

Platformer.LoadingState.prototype.preload = function () {
    "use strict";
    var assets, asset_loader, asset_key, asset;
    assets = this.level_data.assets;
    for (asset_key in assets) { // load assets according to asset key
        if (assets.hasOwnProperty(asset_key)) {
            asset = assets[asset_key];
            switch (asset.type) {
            case "image":
                this.load.image(asset_key, asset.source);
                break;
            case "spritesheet":
                this.load.spritesheet(asset_key, asset.source, asset.frame_width, asset.frame_height, asset.frames, asset.margin, asset.spacing);
                break;
            case "tilemap":
                this.load.tilemap(asset_key, asset.source, null, Phaser.Tilemap.TILED_JSON);
                break;
            }
        }
    }
};

Platformer.LoadingState.prototype.create = function () {
    "use strict";
    this.game.state.start("GameState", true, false, this.level_data);
};
Finally, the Tiled State reads the map data and creates the game objects. We’ll go through this state in more details, since it’s the most important state of our game. I recommend that you take a look in the json file generated by Tiled, to have an idea of its structure. If you’re confused about the Phaser map properties and methods, check Phaser documentation (http://phaser.io/docs/2.4.3/Phaser.Tilemap.html).
File TiledState.js in js/states:
var Platformer = Platformer || {};

Platformer.TiledState = function () {
    "use strict";
    Phaser.State.call(this);
};

Platformer.TiledState.prototype = Object.create(Phaser.State.prototype);
Platformer.TiledState.prototype.constructor = Platformer.TiledState;

Platformer.TiledState.prototype.init = function (level_data) {
    "use strict";
    this.level_data = level_data;

    this.scale.scaleMode = Phaser.ScaleManager.SHOW_ALL;
    this.scale.pageAlignHorizontally = true;
    this.scale.pageAlignVertically = true;

    // start physics system
    this.game.physics.startSystem(Phaser.Physics.ARCADE);
    this.game.physics.arcade.gravity.y = 1000;

    // create map and set tileset
    this.map = this.game.add.tilemap(level_data.map.key);
    this.map.addTilesetImage(this.map.tilesets[0].name, level_data.map.tileset);
};

Platformer.TiledState.prototype.create = function () {
    "use strict";
    var group_name, object_layer, collision_tiles;

    // create map layers
    this.layers = {};
    this.map.layers.forEach(function (layer) {
        this.layers[layer.name] = this.map.createLayer(layer.name);
        if (layer.properties.collision) { // collision layer
            collision_tiles = [];
            layer.data.forEach(function (data_row) { // find tiles used in the layer
                data_row.forEach(function (tile) {
                    // check if it's a valid tile index and isn't already in the list
                    if (tile.index > 0 && collision_tiles.indexOf(tile.index) === -1) {
                        collision_tiles.push(tile.index);
                    }
                }, this);
            }, this);
            this.map.setCollision(collision_tiles, true, layer.name);
        }
    }, this);
    // resize the world to be the size of the current layer
    this.layers[this.map.layer.name].resizeWorld();

    // create groups
    this.groups = {};
    this.level_data.groups.forEach(function (group_name) {
        this.groups[group_name] = this.game.add.group();
    }, this);

    this.prefabs = {};

    for (object_layer in this.map.objects) {
        if (this.map.objects.hasOwnProperty(object_layer)) {
            // create layer objects
            this.map.objects[object_layer].forEach(this.create_object, this);
        }
    }
};

Platformer.TiledState.prototype.create_object = function (object) {
    "use strict";
    var position, prefab;
    // tiled coordinates starts in the bottom left corner
    position = {"x": object.x + (this.map.tileHeight / 2), "y": object.y - (this.map.tileHeight / 2)};
    // create object according to its type
    switch (object.type) {
    case "player":
        prefab = new Platformer.Player(this, position, object.properties);
        break;
    case "ground_enemy":
        prefab = new Platformer.Enemy(this, position, object.properties);
        break;
    case "flying_enemy":
        prefab = new Platformer.FlyingEnemy(this, position, object.properties);
        break;
    case "goal":
        prefab = new Platformer.Goal(this, position, object.properties);
        break;
    }
    this.prefabs[object.name] = prefab;
};

Platformer.TiledState.prototype.restart_level = function () {
    "use strict";
    this.game.state.restart(true, false, this.level_data);
};
First, we have to tell Phaser what image represents each tileset we used in Tiled (the Tiled tilesets are in this.map.tilesets). Since we have only one tileset, and we have the image name from our json file, we can easily do that.
Next, we have to create the map layers. The map object has a layers array that we will iterate. If a layer has the property collision that we added in Tiled, we have to make it available for collision. To do this, we need to tell Phaser which tiles can collide, so we iterate through layer.data, which contains all the layer tiles and add them to a list. At the end, we set the collision for all these tiles. After creating all layers, we resize the world to be the size of the current layer. Since all our layers have the same size, we don’t care which one is the current layer.
The next step is to create the groups of our game. This can be easily done by iterating the groups array of our json file and adding a new group for each one of them. However, two things are important in this step: 1) the order of the groups define the order they are drawn on the screen; 2) groups must be created after layers, otherwise the layers would be drawn above them.
Finally, we go through all object layers (in our case, only one) and create the game objects. Since in our map we defined the object type, it is easy to instantiate the correct Prefab. Notice that our prefab position is not the same position of the Tiled object. That happens because Tiled coordinates start at the bottom left corner, while Phaser coordinates start at the top left corner. Also, we want our prefabs anchor point to be 0.5, so we have to set the position to be the center of our prefab.
Prefabs
In Phaser, prefabs are objects that extend Phaser.Sprite, acting as objects in our game. In our platformer game, we will need four prefabs: Player, Enemy, FlyingEnemy and Goal, which will all be explained now. This is our Prefab class:
File Prefab.js in js/prefabs:
var Platformer = Platformer || {};

Platformer.Prefab = function (game_state, position, properties) {
    "use strict";
    Phaser.Sprite.call(this, game_state.game, position.x, position.y, properties.texture);

    this.game_state = game_state;

    this.game_state.groups[properties.group].add(this);
};

Platformer.Prefab.prototype = Object.create(Phaser.Sprite.prototype);
Platformer.Prefab.prototype.constructor = Platformer.Prefab;
Player
Our player will be able to walk, jump and kill enemies. For that we will need the following properties: walking speed, jumping speed and bouncing, which are all initialized in the constructor.
In the update method, we check all the player collision (collision layer and enemies) and do the walking and jumping logic. There are some important details to notice regarding player walking. First, we don’t want to change the player direction while he’s already moving. For example, if he’s moving left and the right arrow is pressed, we want the player to keep moving left until the left arrow is released. So, we change the player velocity only when the correct key is pressed and the player isn’t moving in the opposite direction. Second, we have to change the sprite direction accordingly. To do this, we use the scale attribute of the sprite, which will invert the sprite direction.
To allow the player to jump, we can just check for the up arrow key in the update method and change the velocity accordingly. The only important thing to notice here is that we only want to allow the player to jump when it is touching the ground. Since the ground is a tile, we have to use the blocked property of body, not touching (check the documentation in http://phaser.io/docs/2.4.3/Phaser.Physics.Arcade.Body.html for more information).
Another thing we have to check is if the player had fallen. For that, we check if the player bottom y is equal to the world height. If so, the player dies.
Finaly, the hit enemy method checks is called when the player collides with an enemy and checks if the player is on top of the enemy. If that’s the case, the enemy is killed, otherwise the player dies.
File Player.js in js/prefabs:
var Platformer = Platformer || {};

Platformer.Player = function (game_state, position, properties) {
    "use strict";
    Platformer.Prefab.call(this, game_state, position, properties);

    this.walking_speed = +properties.walking_speed;
    this.jumping_speed = +properties.jumping_speed;
    this.bouncing = +properties.bouncing;

    this.game_state.game.physics.arcade.enable(this);
    this.body.collideWorldBounds = true;

    this.animations.add("walking", [0, 1, 2, 1], 6, true);

    this.frame = 3;

    this.anchor.setTo(0.5);

    this.cursors = this.game_state.game.input.keyboard.createCursorKeys();
};

Platformer.Player.prototype = Object.create(Platformer.Prefab.prototype);
Platformer.Player.prototype.constructor = Platformer.Player;

Platformer.Player.prototype.update = function () {
    "use strict";
    this.game_state.game.physics.arcade.collide(this, this.game_state.layers.collision);
    this.game_state.game.physics.arcade.collide(this, this.game_state.groups.enemies, this.hit_enemy, null, this);

    if (this.cursors.right.isDown && this.body.velocity.x >= 0) {
        // move right
        this.body.velocity.x = this.walking_speed;
        this.animations.play("walking");
        this.scale.setTo(-1, 1);
    } else if (this.cursors.left.isDown && this.body.velocity.x <= 0) {
        // move left
        this.body.velocity.x = -this.walking_speed;
        this.animations.play("walking");
        this.scale.setTo(1, 1);
    } else {
        // stop
        this.body.velocity.x = 0;
        this.animations.stop();
        this.frame = 3;
    }

    // jump only if touching a tile
    if (this.cursors.up.isDown && this.body.blocked.down) {
        this.body.velocity.y = -this.jumping_speed;
    }

    // dies if touches the end of the screen
    if (this.bottom >= this.game_state.game.world.height) {
        this.game_state.restart_level();
    }
};

Platformer.Player.prototype.hit_enemy = function (player, enemy) {
    "use strict";
    // if the player is above the enemy, the enemy is killed, otherwise the player dies
    if (enemy.body.touching.up) {
        enemy.kill();
        player.y -= this.bouncing;
    } else {
        this.game_state.restart_level();
    }
};
Enemy
Our enemy will be simple, it will only walk up to a maximum distance and then switch direction. For this, the properties we need are: walking speed, walking distance and direction. Notice that, in the constructor we set the initial velocity and scale according to the direction property. Also, we save the previous x position, which in the beginning is the sprite x.
In the update method we check if the walked distance (this.x – this.previous_x) is greater or equal to the maximum walking distance. If that’s the case we switch the direction, updating the velocity, previous x and scale.
File Enemy.js in js/prefabs:
var Platformer = Platformer || {};

Platformer.Enemy = function (game_state, position, properties) {
    "use strict";
    Platformer.Prefab.call(this, game_state, position, properties);

    this.walking_speed = +properties.walking_speed;
    this.walking_distance = +properties.walking_distance;

    // saving previous x to keep track of walked distance
    this.previous_x = this.x;

    this.game_state.game.physics.arcade.enable(this);
    this.body.velocity.x = properties.direction * this.walking_speed;

    this.scale.setTo(-properties.direction, 1);

    this.anchor.setTo(0.5);
};

Platformer.Enemy.prototype = Object.create(Platformer.Prefab.prototype);
Platformer.Enemy.prototype.constructor = Platformer.Enemy;

Platformer.Enemy.prototype.update = function () {
    "use strict";
    this.game_state.game.physics.arcade.collide(this, this.game_state.layers.collision);

    // change the direction if walked the maximum distance
    if (Math.abs(this.x - this.previous_x) >= this.walking_distance) {
        this.body.velocity.x *= -1;
        this.previous_x = this.x;
        this.scale.setTo(-this.scale.x, 1);
    }
};
Flying Enemy
Now that we have our regular enemy, creating a flying enemy is very easy. We will just create another prefab that extends Enemy, and that isn’t affected by the gravity. Also, since your flying enemy asset is different, we have an animation too.
File FlyingEnemy.js in js/prefabs:
var Platformer = Platformer || {};

Platformer.FlyingEnemy = function (game_state, position, properties) {
    "use strict";
    Platformer.Enemy.call(this, game_state, position, properties);

    // flying enemies are not affected by gravity
    this.body.allowGravity = false;

    this.animations.add("flying", [0, 1], 5, true);
    this.animations.play("flying");
};

Platformer.FlyingEnemy.prototype = Object.create(Platformer.Enemy.prototype);
Platformer.FlyingEnemy.prototype.constructor = Platformer.FlyingEnemy;
Goal
Our goal is simple. It has a next level property, and overlap with the player. If the player reaches the goal, the next level should be started.
Notice that, to load the next level we only need to start the Boot State sending as parameter the path of the next level json file. In this tutorial, we will have only one level, but this structure makes it simple to make it a multilevel game. Try creating different levels, and see how it works.
File Goal.js in js/prefabs:
var Platformer = Platformer || {};

Platformer.Goal = function (game_state, position, properties) {
    "use strict";
    Platformer.Prefab.call(this, game_state, position, properties);

    this.next_level = properties.next_level;

    this.game_state.game.physics.arcade.enable(this);

    this.anchor.setTo(0.5);
};

Platformer.Goal.prototype = Object.create(Platformer.Prefab.prototype);
Platformer.Goal.prototype.constructor = Platformer.Goal;

Platformer.Goal.prototype.update = function () {
    "use strict";
    this.game_state.game.physics.arcade.collide(this, this.game_state.layers.collision);
    this.game_state.game.physics.arcade.overlap(this, this.game_state.groups.players, this.reach_goal, null, this);
};

Platformer.Goal.prototype.reach_goal = function () {
    "use strict";
    // start the next level
    this.game_state.game.state.start("BootState", true, false, this.next_level);
};
Finishing the Game
Now that we have our game logic, we know what properties are necessary to be defined in the Tiled map. We can just set them on our map and our game is working!
Let me know in the comments section your opinion and what you would like to see in the next tutorials.
